|
|
|
Andrew Buchner

7/4/2025 8:05 PM
|
The extractor is now back together, and the impeller should be stuck on properly this time. All of the circuit is reenergized.
If you ever hear the fan blade come to a sudden stop, or a rattling noise from the shed, please check if it has slid down the shaft.
|
|
|
|
|
|
|
Andrew Buchner
7/2/2025 11:07 PM
|
I didn't tighten the impeller lock device enough when we reinstalled the collector, and today the blade slid down the shaft enough to start scraping on the housing. Grant and I disassembled everything, and being so concerned about tightening the locking bolts enough this time, I snapped the head off one of them. I'll have replacement bolts and an extractor tomorrow by evening, and may be able to re-install the collector with some help, otherwise Friday. The breaker is off and the disconnect in the shed is out, sorry for inconvenience.
|
|
|
|
|
|
|
Andrew Buchner
6/18/2025 10:09 PM
|
Nicholas and I reassembled the collector and wired in the motor. The system is now a little more modular, and can be taken apart for cleaning or moving. The only thing left to do is add a little tape around the top of the filter housing, I will do that tomorrow or Friday. But, dust can be collected again!
|
|
|
|
|
|
|
Nicholas Adams
6/3/2025 9:27 PM
|
Not really. I had to disassemble quite a bit to get it out and damaged the piece that attaches to the filters. I am going to make a faster way to release the filters so the cyclone can be dropped don off the motor. Thanks for bringing it in.
|
|
|
|
|
|
|
Andrew Buchner
6/3/2025 6:45 PM
|
Well I guess you can remove the motor on its own, that is a handy feature. Thank you to Nicholas for taking it down, I'll drop it off at the motor shop in town tomorrow morning. All of the loose parts from the mount are stored in the shed for now.
|
|
|
|
|
|
|
Andrew Buchner
6/3/2025 9:43 AM
|
Thanks, Nicholas. Just looking at the plans, do you or anyone who helped put it together think the motor can be removed without full disassembly? Looks like it went in first and its mounting brackets are the lynchpin of the whole operation. That might be a weekend job.
|
|
|
|
|
|
|
Jeff Makulowich
6/2/2025 4:17 PM
|
I could give you a hand Tuesday night anytime after 1730.
|
|
|
|
|
|
|
Nicholas Adams
6/2/2025 8:26 AM
|
The dust collector is a CV1800 LH. Unfortunatly the owners of Clear Vue have retired. It looks like they may have some parts if we email them. Attached is the user manual.
|
attach_emailAttachment (1)
|
|
|
|
|
Grant Fraser
6/2/2025 5:30 AM
|
Hi Mauricio
Your pump is only 3hp. It wouldn't be strong enough. Thanks for the offer.
|
|
|
|
|
|
|
Andrew Buchner
6/2/2025 12:01 AM
|
Thanks Grant. Probably better to try that first, haha. Is someone available to help me take it down tomorrow or Tuesday evening?
|
|
|
|
|
|
|
Mauricio Quintana
6/1/2025 9:15 PM
|
Grant I have a 220v motor from a spa that may fit. I can drop it off at the space anytime.
|
attach_emailAttachments (2)
|
|
|
|
|
Grant Fraser
6/1/2025 8:02 PM
|
I would try taking it to Kamloops Electric Motor. 1260 Dalhousie (250) 372-9822 Lets see if it can be repaired.
|
|
|
|
|
|
|
Andrew Buchner
6/1/2025 7:39 PM
|
5hp Leeson P145K34DK8A 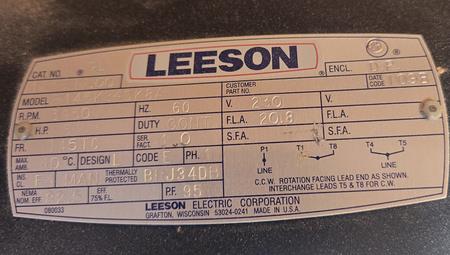
You can factory order one for $800 from eMotorsDirect, unknown lead time (will call tomorrow). There are faster options for more. Not sure what leeway we have on the specs, if we can just get a Baldor with the same input/output, as long as it fits in our rig?
|
|
|
|
|
|
|
Grant Fraser
6/1/2025 4:46 PM
|
We need to replace the motor. We can look for the make and model of the extractor and see what motor is specified. Otherwise we can look at the nameplate on the motor and see what we can find. It gets tricky trying to match the motor mounting points and shaft.
|
|
|
|
|
|
|
Andrew Buchner
6/1/2025 2:17 PM
|
The barrel isn't full yet, or at least the cone and fan aren't blocked up. I blew all the dust out of the motor and was able to even spin the fan with the air nozzle. Even with it spooled up to a good clip, the motor won't turn on when the switch is thrown.
You can hear it drawing current, and the fan blade will twitch, but not turn.
|
|
|
|
|
|
|
Grant Fraser
6/1/2025 9:22 AM
|
Is it so full that the fan is blocked? Sounds like something might be stuck in the blades.
|
|
|
|
|
|
|
Andrew Buchner
5/31/2025 10:33 PM
|
The fan on the dust collector doesn't seem to be turning on. The panel fires up with the switch is thrown, but the fan doesn't turn on and the 16/18 breaker trips after around 15s. I checked the panel, made sure all the breakers were set before trying it again, same result. There is an Out of Order note on the switch.
|
|
|
|
|
|
|
Andrew Buchner
3/31/2025 9:12 AM
|
Haha, thanks. I will admit, the thought did cross my mind why I would put the filter in last over the bag, but it was only an extra 12 bucks. I can see if there's a way to modify the filter to fit in the back, but it seems designed for this (incorrect) configuration.
|
|
|
|
|
|
|
Grant Fraser
3/29/2025 4:48 PM
|
I did that at the old space and found the pre-filter plugs very quickly. You might abandon that when the costs add up.
Filtering after the bag filter would give better air quality for less cost. Having a fine filter in front of a course filter leaves the coarse filter with nothing to catch.
Using a washable filter would also help with cost.
|
|
|
|
|
|
|
Andrew Buchner
3/29/2025 3:43 PM
|
Its close enough related to the dust collector, but the filter bag on the overhead dust extractor fan has been replaced, and now we also have the box filter piece in front of it. The old bag filter will be cleaned and kept as a spare. 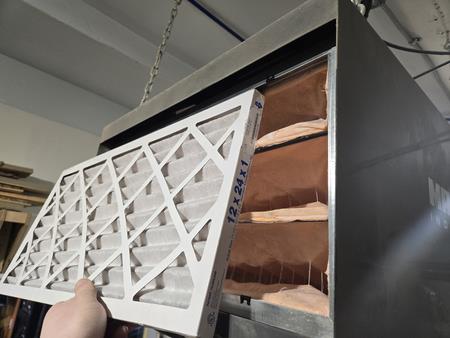
|
|
|
|